Strategies & Walkthroughs
General strategies and tips
Enclosed Repair Facility
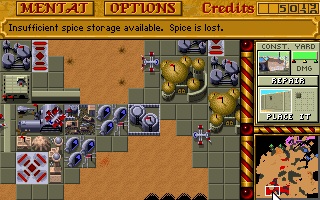
See how to enclose your Repair Facility in order to make the Carryalls to the hard work for you. Once you have sealed off this building Carryalls will ferry your damaged units from the battle scene and then return to their initial position.
Fremen Help Atreides Overwhelm the Enemy
To use Fremen effectively you need to build as many palaces as you can afford, generate Fremen as often as possible, and overwhelm the enemy with sheer numbers of them. They are very useful for mapping out the enemy base, but as you can’t control their movement, it makes the mapping somewhat erratic. In the unpatched version, Rocket Turrets don’t fire on them, only vehicles that are being attacked. In the patched they are fired upon by rocket turrets.

The Power of the Sonic Tank

Sonic Tanks are most effective against foot units, which they can destroy in two hits. They are also very useful against Rocket Turrets, provided you put the Game Speed to Fast/Fastest, as this is a bug [in some versions] which increases their range.
Sonic Tanks are one of the most powerful units – so with the Atreides, focus on buildings an army of sonic tanks, bunch them up together and move them slowly – they’ll be an unstoppable force. Since they have long range, can’t hurt each other, and can do damage to multiple enemies at once along a line.
Ordos Missile Launchers? Get a Starport
More than any other house, it is of paramount importance for the Ordos to build a Starport and to buy Missile Launchers. More than any other house, it is of paramount importance for the Ordos to build a Starport and to buy Missile Launchers. They won’t have access to build any in the Heavy Factory like the other houses.

Another more general strategy for Starports — early in a mission, established bases will have Siege tanks when you don’t have any. Use the Starport to get your own or isolate the attacking Siege tank with 3-4 combat tanks to ensure its destruction.
The Raider Spy
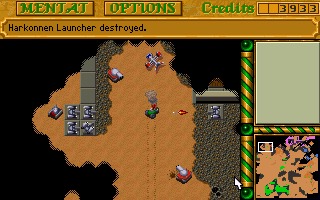
An Ordos Raider trike boldly goes into the Harkonnen base to check the location of enemy buildings. Other areas of the map have already been revealed. Unfortunately, level 9 is a little predictable for all houses as the layout of each base is almost identical with Saudukar taking centre stage. At this level avoid building Ordos Palaces as these only produce weak Saboteurs, capable of getting killed quicker than an Ornithopter or, at most, destroying a wall.
Mobile Spice Blooms
Use a Harvester or two as magical spice storage to assist with the end of the later missions. Once all the spice has been harvested, move your fully loaded Harvester to an open space in the desert and blow it up with an armed unit. The spice contained within will be distributed across the sand — over 3 times the spice than originally harvested — giving you a valuable resource bonus when you may need it.
Worm Food
Worms have an appetite of three units and will disappear once satiated. If you don’t feel like an arduous attack from solid ground, just feed the Worm a few of your less helpful units and they’ll be out of your way. Feeding the Worm will help avoid losing Harvesters at the early stage of a mission when you really need credits in the bank to get started.

Worms will follow units, so if you have Turrets at your base in later missions, use these with your tanks to take down the Worm’s health to 50% and it will disappear.
Deviator Madness

One Deviator on standby is more than enough, so protect the one you get at the start of the mission. Use the Deviator to take control of enemy units – on conversion, immediately send the new “employee” to the enemy base; select the attack command, and wait… when this unit inevitably switches allegiance, issue one final attack order. Once set, it will continue attacking from that point onwards. This is particularly effective when the enemy base already has been scouted and you can easily reach key enemy buildings.
Saboteur’s are Random and Unhelpful
Saboteurs are not worth training as they are highly unlikely to break through any solid defence. In general, save your money, don’t build a palace, and buy other units instead. If you do want to use them, it is best to send them both (you get two at a time) against the same target, generally a turret. The first one will hopefully destroy the turret and the second one should destroy the building behind it. Even better: try to get them to destroy the opposing palaces. Be sure that you always leave a direct path from the palace to the target – they will destruct on the first building they come to, yours or the enemy’s.

Powerful Death Hand Missile
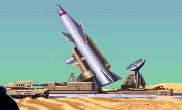
If you have a Death Hand Missile ready to launch, let it fly! While extremely powerful, it is also the most highly inaccurate projectile. Target them towards a group of buildings; if you’re lucky they might hit the target! What you aim for and what you hit are generally two very different things, but their power is undeniable!
However, if you put the pointy end of your mouse on the top of a structure’s flag when aiming and simultaneously hold down the letter T, this missile will destroy that structure and those around it in a single shot. Another method of firing the Harkonnen Death-hand, to improve accuracy, is to judge the distance between your palace and your target. Give it a number between 1 to 10 based on the length of the map, 1 is right next to your base and 10 is a whole map screen away. Fire the Death Hand on the corresponding number on the countdown. If you want to improve accuracy in a more tedious way, you can save the game just before launch, then reload the game until you hit the required target.
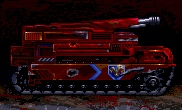
Destructive Devastator
A group of Devastators are a formidable offensive or defensive force, but make sure you have a Repair Centre surrounded with walls, as well as a couple of Carryalls. This way, they can attack, do what damage they can, get repaired, and start attacking again. If one is about to be destroyed, it is better to destruct it than to let it explode as it does more damage on Self-Destruct.
Concrete Slabs are better than Repairing
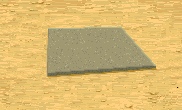
Place concrete slabs before placing structures. It’s worth upgrading the construction yard so you can build the larger slabs. Upgrade the light vehicle and heavy vehicle factories as soon as you can so you can produce siege tanks. It’s worth upgrading the heavy factory several times on later levels so you can produce a mobile construction vehicle. Watch the state of all your structures and repair them when necessary – it costs spice but it’s usually cheaper than building replacements.
Not All Buildings Need a Foundation
Some buildings are not affected by a lack of productivity caused by placing them directly on the rock without a concrete slab. Save time and your credits by placing these buildings without a foundation: silos, outposts, the IX, palaces and light factories (as they aren’t used for production in later missions).
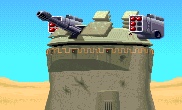
Build Rocket Turrets Rather Than Walls
Don’t bother building walls (they cost too much and don’t last very long) build rocket turrets instead. You need to upgrade the construction yard to be able to build them but you’re going to do that anyway aren’t you? Spot where the enemy are attacking from – they always attack from the same direction – and place concrete slabs on the rock in that direction. Put half a dozen turrets on the extremities of the slabs and with a bit of luck they should see off most of the attackers before they get too close. Keep an eye on the state of the turrets and repair them when necessary.
Trooper take over
When enemy buildings are heavily damaged (at the red level), you can send in one of your infantry or a trooper to take it over. You will now have an opportunity to build from that position. So, have a slab ready to place, since there is a high chance this building will be destroyed.

Once secured, you’ll be able to implement new strategies to vanquish your foes:
- Any mission: Place production structures in the enemy base for faster reinforcements. Watch out for enemy attacks.
- Atreides, Mission 5: Have the Ordos Heavy Factory build Siege Tanks for you.
- Later missions: You can have multiple Rocket Turrets, ready to place – so get yourself a bastion in the enemy base.
- Later missions: Place your one and only Repair Facility in the enemy base, for constant repairs on the spot.
- Ordos, Mission 9: Placing a Palace with a Saboteur right next to an enemy base. This is very tricky, but if you see the chance, the path for your Saboteurs will be much more effective in destroying enemy structures.
Walkthroughs
There are nine missions to complete for each of the three houses – with the first two being very easy and similar to a basic tutorial rather than offering a challenging experience. The third and fourth missions will always have one enemy base to find and destroy with subsequent missions have two and the final mission there are three houses including the Emporer’s Saudukar. Here are a few edited walkthroughs for each one…
Mission 1
Longevity of building is not a requirement so without a foundation, build a Refinery to start the process of harvesting the Spice.
Explore the immediate area with your units and take out the enemy as you come across them. That’s about it, there’s not much more to this mission.
— Nahoo
Mission 2
In the second mission, an enemy base will be present, but there is really no need to attack it. Simply focus on harvesting the Spice – you’ll have the chance to do battle in other mission. You can build 2 Refineries, and 2 Silos to hold enough Spice to reach the mission objective.
Mission 3
Emiliano’s walk-through
Firstly, discover the enemy’s position – this is easier to do in a couple passes, so save the game and then send your initial units to every corner of the map and, when you know where the enemy is, reload the saved game. The save/load trick is necessary because the enemy will attack you heavily when “discovered” in the map and this is quite bad at the outset of any mission.
Place all your units in the direction of the enemy’s attack – that is the direction of their base – to have a good defence. Leave a few units in other parts of your base; because at the beginning the enemy will air drop units randomly near your base. Build a Windtrap and a Refinery, followed by a Radar Outpost and a Light Factory.
If you play with Harkonnen, build a WOR to have stronger troops to your Quads; Atreides and Ordos troops are much less effective, so it’s better if you don’t train them. Also, upgrade the Light Factory to build Quads (Trikes are weak); this cannot be done if you are playing with Ordos (these first missions playing as Ordos are harder).
Build a second Refinery (this is a must in every missions: always build at least 2 refineries, from the beginning) and store credits, while defending yourself from attacks. Your defence units should be placed very near each other (i.e. in adjacent cells) to have more fire power against attackers.
When you have stored enough credits (8,000-10,000) it’s time to plan the attack. Build another Light Factory (one is not enough to send the reinforcements that you’ll need in the attack) and build Quads (and some Troopers if you want) until you reach the maximum number of buildable units.
Group all your units on a rock near the enemy base, save, and begin the attack. Your primary objectives are:
- The Light Factory
- The Construction Yard
If you destroy those buildings you will win. Do not waste too many resources fighting enemy units for now – just focus on these buildings in the mission objective. Once done, you should destroy the Troop Training building; after that you can destroy enemies units. Due to the unit limit, each time any unit is destroyed start building a new Quad and send it immediately into the battle. Using this technique you will be able to win.
Simon’s Walk-through
After building a Windtrap and refinery, build a Radar Outpost as soon as you have the cash – this will help you keep track of what vehicles are around.
Once you have these basic buildings, build more Windtraps and a Light Factory.
Then build your heaviest units and place them at the front of your base, facing in the direction of the enemy, to defend the buildings.
It is now time to build another Refinery to build up some credits.
Make sure you leave a couple of units at the rear and sides of your base to defend against units brought in by the AI’s Carryalls.
After you have set up this defence, build as many offensive units as possible, until the “Unable to create” message comes up.
Then send a series of raiding groups of 3-4 units out to scout the enemy base, and locate the Construction Yard. Don’t worry if these units are destroyed – just build some more as quickly as possible.
Once you have found the main enemy buildings, try doing a flank attack with a large group of units to destroy the Construction Yard first, as this will stop the enemy from creating more structures once you destroy them.
When the Construction Yard is destroyed, focus on the offensive buildings (i.e. Light Vehicle Factory, WOR and Barracks). If you start losing vehicles, call off the building attack and use the remaining vehicles to take out as many enemy vehicles as possible before they die.
Try to re-build your forces as quickly as possible, as the computer will often counter attack when you have just retreated – so don’t leave your base undefended.
Mission 4
In this mission you can build the Heavy Factory and Walls. Walls are useless, except in the direction from where the attacks will come, so don’t waste your time building Walls all around your base.
From this mission onwards you don’t need Troops any longer, they are obsolete; just build Tanks and Quads instead. As always, build two Refineries; also build an additional Harvester, using a Heavy Factory. To win this mission, you should proceed in the same way as the previous mission: build the maximum number of units, wait to have enough credits for reinforcement and lead the attack.
Before attacking, you should have one Light Factory and two Heavy Factories. Your primary objectives should be Light Factory, Heavy Factories and the Construction Yard. Except for Tanks, this mission is quite similar to mission 3, so you can apply a similar strategy to win this.
Mission 5
This is the first difficult mission. You have new buildings: Light Turrets, Repair Facility and High Tech Factory with new units: the Cargo and the Rocket Tank.
From this mission is very important to plan a good defence before starting any attack. So, quickly build 2 Refineries and the Light Factory; keep all your units in defence, until you build 5-6 Light Turrets in the attack main path.
Light Turrets should not be built in adjacent cells, but within a distance of one-two cells. While creating the new buildings, create some Quads if the enemy’s attacks are frequent.
Once the Light Turrets are in place, you can build a Heavy Factory; with that you can make a new harvester. The Repair Facility isn’t very useful (but it will became essential in subsequent missions), so you can avoid its construction.
When your defence is ready (the enemy’s attacks are now ineffective), you can build the High Tech Factory to have Cargos. Cargos are very useful, because they will transport Harvesters from Spice fields to refinery and vice-versa: this means that you don’t have to manage the resource collection anymore.
Enemy will also attack using Rocket Tanks; it’s easy to take them out using quads: simply move 1 or 2 adjacent to the enemy’s Rocket Tank’s and attack it.
When you have enough credits (12,000 at least) make another Heavy Factory and begin to build Tanks. Also build 2-3 Rocket Tanks (you don’t need more).
Attack should be done in the usual way: build the maximum number of Tanks that you can and lead a massive attack against the enemy base. It will be hard to win in a single attack, since enemy defence is quite strong. Always remember that your primary targets should be the factories and the Construction Yard. Use Rocket Tanks to destroy buildings beyond walls and use tanks to protect them from enemy attacks.
If you see that you are losing the battle, retreat back to your base so you can build up forces and lead another attack. Enemy turrets can be annoying so use 2-3 tanks to take them down quickly. Do not use Quads or Rocket Tanks to destroy them: their armour is too weak and Rocket Tanks are more effective against buildings.
Mission 6
Ok, now things begin to get harder…
As always, build 2 Refineries, Light Factory (useful only to unlock other building construction, since from this missions you don’t need Quads anymore) and a Heavy Factory, which should be used to build a new Harvester.
Now think to defence: place 5 or more long-range turrets in the attack main path, as explained in the previous mission. Enemy units will often target the Heavy Factory, so the key is that they must be under Rocket Turret’s fire while approaching to your buildings (to destroy the units before they reach the building).
From this mission you can build the Space Dock, and you can use it to buy Cargos (so you don’t have to build the High Tech Factory) and Tanks – one Heavy Factory will be enough, even during attacks.
The Repair Facility is now essential – since you can build the more expensive Siege Tanks now, it’s much less expensive to repair them rather creating from scratch.
If you are the house Atreides you can build Ornitopter but they are useless, so don’t waste your money. If you are playing as Ordos, you can now have launchers, ordering them from the Space Dock.
When you have enough credits, it’s time to begin the attack. From this mission onwards, it is a suicide to lead a massive attack to the enemy base, since it is well defended. Use 1-2 launchers escorted by some Tanks. Approach to the nearest enemy’s Rocket Turret and use Rocket Tanks to destroy it (this can require a lot of time) and the surrounding buildings. Use Tanks to defend Rocket Tanks when the enemy attacks. Remember that you should do hit-and-run attacks, so if you think you are losing, just retreat. This is a good procedure: approach, destroy, defend, retreat. The closer you are to the enemy’s base, the more units you’ll have to fight simultaneously; this means that you should not approach too much, at least during first attacks. When you think the enemy has fewer units than you, it is time to lead a massive attack and finish them.
Mission 7
Watch out for Ornithopters
At the start of this level, no matter which house you are, you must build a couple of Rocket Turrets as soon as possible. On this level, the computer will always send a series of Ornithopters against you. Without the Rocket Turrets to defend against the Ornithopters your buildings will soon be in ruins.
Emiliano’s walk-through
This mission is quite similar to the previous one, except that each House can now build new units. Ordos have the Deviator, Atreides have the Sonic Tank and Harkonnen have the Devastator.
If you are playing as Atreides, Sonic Tanks are very useful in defence – placing them in front of your Rocket Turrets and to take out the enemy turrets (they are quicker than Rocket Tanks). Deviators are useful to steal an enemy’s Cargos, but this is less useful in battle. I don’t use them very much. I think these units are more powerful when used by the AI (as their effect lasts longer in this case), so quickly destroy them using Tanks by placing them in the Deviator’s adjacent squares. Devastator is powerful, but it’s also very slow, so it’s not very good for hit-and-run attacks and I suggest using them in the final phase of the mission. However, these new units are very expensive and weak (except the Devastator which is heavy armoured), so be careful and be quick to send them to the Repair Facility when they are damaged. There is not much to say for this mission: proceed in the same way as the previous one. New units will not make much difference (maybe with the exception of Sonic Tanks against Rocket Turrets), so focus on building other units of these.
Mission 9, Final
Establishing strategy
In case you haven’t noticed, the layout for this level never changes – only the Houses of the various enemy bases switch places. You will be facing two Death Hand Missiles (unless you are the Harkonnen) and an attack wave which lasts around 15-20 minutes. Once you’ve overcome these obstacles, it’s just a matter of destroying the enemy bases, much as before.
Overcoming the Death Hand Missiles is mostly down to luck – either you get hit or you don’t. It is possible (not even especially difficult) to get through this battle without using the ‘save/restore’ game cheat. It mostly depends on whether or not the first two missiles hit your Construction Yard. Most of the time, they will not hit this crucial building. To ensure you don’t need to worry about these missiles, you need to build a Starport – this is what I have found is the best way to mitigate the effects of these missiles.
Start exploring to find the spice reserves. There are plenty of them around, so you won’t run out of money if you harvest quickly. You start out with 1,000 credits (or 1,500 if you’re the Ordos). This is just enough money to build concrete over to the left, as far as you can go (in a straight line), then a power centre and a spice facility. When your Harvester returns, keep building to the left and build a Spice Facility and a Radar Outpost. When these Harvesters return, build more Windtraps, and build your Starport. By this time, the enemy should have found your base. Note that the Death Hand Missiles will not be launched until units from the respective houses (Sardaukar and Harkonnen) have actually found your base. By this time though, you should have enough money to buy an MCV. If your Construction Yard does get hit, deploy it (try another rock usually because they won’t always find it) and rebuild. If it doesn’t get hit, you can move it to the rock to the right of your base and wait. You now have a Construction Yard in reserve.
The Death Hand Missiles will usually aim at the Construction Yard. So long as you build buildings a reasonable distance away, they won’t get hit. This is one obstacle down. The other obstacle is an attack wave from all three opposing houses that lasts about 15 to 20 minutes. The best defence here is 6-7 rocket turrets on the rock just above your construction yard (they tend to get hit by Death Hand Missiles, but are easy to rebuild), and two or three on the northern most part of the main rock (towards the top left). This will help defend against all three houses.
Winning strategy
Your first target should be the house on the far right. Despite what you think, once you are well established, and have two or three harvesters out and about, Death Hand Missiles are not that serious. Thus, getting the palaces that make them isn’t that important.
The house on the far right (either Atreides or Ordos) has only one Construction Yard; this is poorly defended. Focusing on the Construction Yard is the best focus for your initial attack. Approach from the bottom of the screen and go straight up – about 7 or 8 squares from the right edge of the screen.
If your aim is good, you will find a rocket turret at the southern edge of the base, and behind it either a refinery or a Light Vehicle Factory. Destroy this turret and advance quickly to destroy the structure behind it. Behind that is the construction yard for this house. Be careful, you can usually expect to be attacked by a number of Siege Tanks and Rocket Tanks, both from this house and from the Emperor’s. Once the Construction Yard here has been destroyed, you can take apart the rest of the base at your leisure, but it should be destroyed as much as possible before moving on to the next.
Your next target will always be the Emperor’s base with 2 Construction Yards, one far in the top right hand corner of the screen (which can be quickly destroyed after taking out the first base), and another heavily guarded behind his Palace. Use one or two Rocket Tanks defended by Siege Tanks to advance through his base via the top, making sure to take out any offending Rocket Turrets below with other Rocket Tanks. The units below should be larger in number as they will be facing the brunt of the Emperor’s forces. Try to advance as quickly as possible: the computer rebuilds buildings roughly in the order in which they were destroyed, though it rarely rebuilds a Construction Yard if it has another. Don’t let it have the time to rebuild enough to build the other Construction Yard. Eventually, your units on the top will reach the edge of the Emperor’s Palace. Just above it will be the second Construction Yard. Be careful though, the construction yard is close enough to the Palace to be well within range of the excellent defence the Emperor’s palace has with 6 Rocket Turrets, 3 Rocket Tanks and a lot of Concrete Wall. The Palace is easy enough to destroy before or after taking out the Construction Yard. Let the first target be based on how badly Death Hand Missiles are taking out your base.
Once the Emperor’s Palace is gone, only the base on the left remains: Harkonnen or Ordos. This base, like the Emperor’s, has two Construction Yards, but here they are placed close together. To access these you must go through most of the base, but given enough Rocket Tanks, this is not a big problem. Advance as before, taking out the Rocket Turrets first, then the Palace and Heavy Vehicle Factory you will find just behind the first Rocket Turret you meet (attacking from the right).
From this point, it will not be difficult to take out the rest of his base from the top inwards. Move right and you will find two Construction Yards next to each other behind a few Windtraps. Take these out and the game is basically over. The only thing you should watch for is in sending more troops for support – this base has a number of small ‘arms’ which jut out from it and have four Rocket Turrets as fingers. These are nasty things for unsuspecting vehicles to wander by on their way to the slaughter at the top of the screen.